


Would you rather save on the amount of scrap or the amount of time spent cutting? It’s a difficult trade-off. What would you say if you could do both?
Here are three methods that will minimize scrap and cut time on your next industrial cutting project:
- Nesting
Nesting involves positioning your parts to be cut in such a way that maximizes the amount of material that ultimately becomes a part. In many cases it enables common line cutting where parts shares a cut line by arranging parts, so that they have a common edge. For example, say you want to cut out four squares – Figure 1. Instead of cutting them individually and making 16 individual cuts, you can make 6 cuts – Figure 2. In this example, nesting has reduced the number of cuts by 63%. (NOTE: 2 cuts will be double the length of the other cuts).
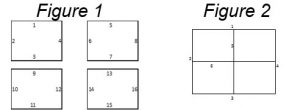
Nesting also enables higher product yield from the same amount of starting material. It’s not uncommon to increase the product yield 40% while simultaneously decreasing cut time.
Nesting can be a tremendous time and material saver if done correctly and carefully. However, if a cut line fails, you lose not one part but two. So ensure your cutting parameters are sound before cutting.
- Lead-ins and Lead-outs
Employ lead-in and lead-out cuts to ensure quality cuts and reduce scrap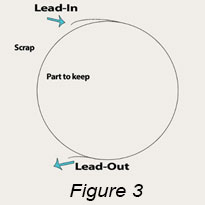 . To cut a lead-in, start the cut slightly outside the edge of the object and lead the laser head into the cut line. The same technique at the end of the job could be used to finish the cut by using a “lead-out”. The laser would cut the part and then continue into the scrap part to finish the cut. Figure 3 illustrates this method.
In other words, a lead-in allows the laser to enter the cut line and ensure that you’re into the material and cutting, while a lead-out allows the laser to exit the cut line and move onto the next part.
However, lead-ins/lead-outs actually add time to any given part’s cut time. Lead-ins/lead-outs add about half a second of cut time per part, due to the incremental increase in linear cutting inches. However, factor in an entire project and lead-ins and lead-outs save you time since they ensure the laser is cutting the material BEFORE cutting the part you want to keep. This, in turn, reduces the need to scrap material due to poor cuts. Combine lead-ins/lead-outs with effective nesting to increase productivity while mitigating the risk of making cuts that don’t you’re your specifications.
- Tabbing (or Bridging)
We’ve all received packages with “assembly required” written in the fine print. We tear open the box and see the component parts must be “popped” out of a sheet of parts. The process of creating the “pop-out” parts is called “tabbing”. The tabbing process leaves parts minimally attached to the original material via tabs or bridges.
Tabbing can be great time saver, especially for thin materials, because it keeps your parts attached to the skeleton so you don’t need to pick up hundreds parts after cutting.
Tabbing also reduces risk of damaging material since small cut parts can inadvertently blow off the table getting a scratch, ding or bend as they scrape across other parts or fall to the floor. Moreover, finish cuts with a clean, tabbed skeleton preemptively sidesteps the need to polish the material before carrying on with your project.
Conclusion
Efficiency and productivity is essential when cutting. The next time you go to cut, try these methods and see how much time and scrap you can reduce from your work day.
Have more time or material saving cutting tips or some thoughts about these? Join the conversation and leave your comment below.
Vytek has solved thousands of unique application challenges over its 26 year history of manufacturing CO2 and Fiber laser cutting, marking and engraving machines. Call us to discuss yours: 978-342-9800.